Zulfadli Bin Mohd Saad
Computer Technology, Department of Electronic
MARA Vocational Institute, Sik, Kedah.
Lab 3: Domain Name Services
In this exercise you will implement a domain name server for your network. This server provides a means of resolving Internet domain host names to TCP/IP addresses.
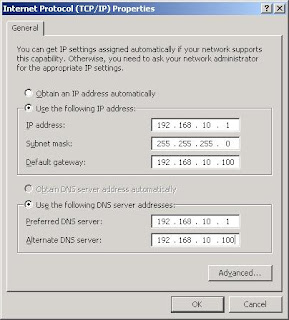
The first step is required to ensure that you are using a static IP address and that the DNS settings on the computer have been correctly configured. Make sure your have hook up your PC to the network before you start.
1. Log on to Windows Server 2003 as "Administrator"
2. Close the dialog box "Manage Your Server" 3. Open Local Area Connection (Start – Control Panel – Network Connections – Local Area Connection).
4. Click Properties button.
5. Ensure that the computer has a static IP address and that the DNS server address has been set to the same IP address.
This server is going to act also as a DNS server, thus needs to send requests to itself.
| |

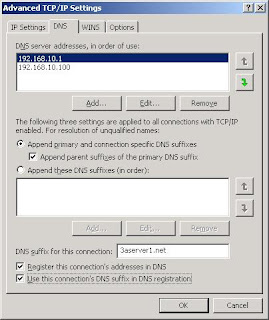
6. Click the Advanced button

7. Close the remaining dialog boxes.
8. Right-click My Computer and select Properties.
9. Click the Computer Name tab, then click Change.
10. Click More.
11. Specify domain.net as the Primary DNS Suffix for This Computer.
12. Click OK.
13. Click OK to close the remaining dialog boxes, and then click YES to restart the computer.
Now that you have verified that the computer is correctly configured to use DNS and has a static IP address, it is now time to proceed and install the DNS service on this computer.
14. Open Control Panel and click “Add Remove Programs”, then click “Add/Remove Windows Components”
| Scroll down the list and |
15. Scroll down the list and check the option “Domain Name System (DNS)”
| After checking the option, Click OK. |
16. Click NEXT to install the DNS service.
17. Once the service has been installed, the Windows Components Wizard will appear.
| Click “Finish” to close the wizard. |
18. Close any remaining dialog boxes.
Now that the DNS service is installed, it is time to configure it. When the service is run for the first time, it asks to configure the root name server. If you are connected to the Internet, DO NOT configure a root name server (you would only do this if you were creating an Intranet and your company had no Internet connection).
19. Click Start, All Programs, Administrative Tools, DNS
20. The DNS management tool is now displayed. Your computer should appear as an icon in the left pane window.
| Click on the computer icon to display the message as shown in this example. |
A DNS server uses zone files (forward and reverse) to perform lookup requests. In each zone file records are used to map computer names to IP addresses. In the following section you will create a forward and reverse zone for your network, and create records that map computer names to IP addresses.
21. Click Action then Configure a DNS server. The Welcome to the Configure a DNS Server Wizard appears.
Click Next.
| Specify the option "Create a forward and reverse lookup zones". Click NEXT. |
22. It is now time to create a forward lookup zone that will resolve computer names to IP addresses.
| Select the option "Yes, create a forward lookup zone now". Click Next. |
23. Select "Primary Zone". Click NEXT.
24. The New Zone Wizard dialog box requests the name for the zone. Enter the name that has been assigned to your domain as given to you by your instructor (this example uses domain.net).
| Once you have entered the correct name for the zone file, click NEXT. |
25. The dialog box now displays the name that will be used to the new zone file.
| Leave the filename as suggested, then click NEXT. |
26. Select the option "Do not allow dynamic updates". Click NEXT.
27. Select the option "Yes, create a reverse lookup zone now". Click NEXT.
28. Select the zone type as "Primary Zone". Click NEXT.
29. A reverse zone maps IP addresses to computer names, so it has to know what range of IP addresses it will be responsible for.
| Enter the first 3 octets of the IP address that has been allocated to your network domain by the instructor. After entering the network ID, click NEXT. |
30. The wizard will display the name of the reverse zone file that it will create.
31. What is the name of the reverse file?
____________________________________________________
32. Click NEXT.
33. Select the option "Do not allow dynamic updates". Click NEXT.
34. Select the option "No, it should not forward queries". Click NEXT.
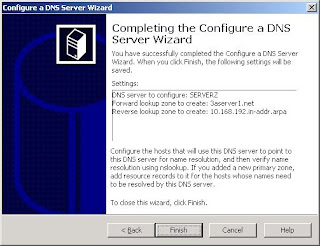
35. Click FINISH so the wizard will create the reverse lookup zone.

You have now successfully created a primary zone (domain.net) and forward zone lookup file.
Double-click on the computer icon to expand the tree and display the forward lookup zone.
36. What is listed under “Forward Lookup Zones”?
____________________________________________________
____________________________________________________
37. What are the entries listed under domain.net?
____________________________________________________
____________________________________________________
____________________________________________________
38. What is listed under “Reverse Lookup Zones”?
____________________________________________________
____________________________________________________
Dynamic DNS Updates
The Microsoft DNS supports dynamic updating of information, such as computer names and their IP addresses. In networks where computers are assigned IP addresses dynamically (using DHCP), this information needs to be integrated into DNS.
1. Expand the Forward Lookup Zones to reveal the domain (domain.net)
2. Right-click the domain name and select properties.
| The option "Dynamic updates" supports the ability to update DNS information dynamically. To enable dynamic updates select "Nonsecure and secure". Click APPLY. Click OK. Repeat the procedure to enable dynamic updates for the reverse zone. |
3. Close the DNS manager.
Adding a PTR (pointer) record
In this exercise you will add a reverse lookup record (PTR) for a host computer. A reverse lookup record resolves an IP address back to a host name.
1. In the DNS manager window, double-click the computer icon and expand the “Reverse Lookup Zone “ field.
2. Expand the subnet field.
3. Right-click the subnet field and select “New Pointer”
| Enter the IP address and the server name, followed by .domainx.net. (be sure to use a trailing dot after net, and replace x with a number representing your domain). Click OK. Click "Refresh" button. |
Testing the DNS
In this section you verify that the DNS is installed, running, and correctly configured.
1. In the DNS manager window, right-click the computer icon and select properties.
| Click the Monitoring tab. |
2. Enable both tests and click Test Now button.
3. What was the result?
____________________________________________________
Do not proceed till the test results indicate a PASS.
Using NSLOOKUP to query DNS
In this exercise you will use a client tool to check the operation of the DNS server. You will query both a forward and reverse lookup.
1. Close the DNS manager window.
2. Click START, then RUN, and enter nslookup (then press ENTER).
3. A command prompt DOS window will appear with the program nslookup running in it.
4. The default server name and IP address of the DNS server will be shown.
What is the default server name?
____________________________________________________
What is the IP address listed?
____________________________________________________
5. To perform a forward lookup (resolve a computer name to an IP address) enter the name of the computer (e.g. 3aserver1.net) and press ENTER.
What is the fully qualified domain name returned?
____________________________________________________
What is the IP address given?
____________________________________________________
6. To perform a reverse lookup (resolve an IP address to a computer name), enter the IP address given in step 5.
What is the fully qualified domain name returned?
____________________________________________________
7. Close the command prompt windows.
Summary
The DNS server is a database that manages computer names and their IP addresses. Zone files are used to store this information. Within a zone, a forward lookup resolves computer names to IP addresses. A reverse zone resolves IP addresses to computer names.
A client tool such as NSLOOKUP can be used to test the operation of a DNS server.


No comments:
Post a Comment